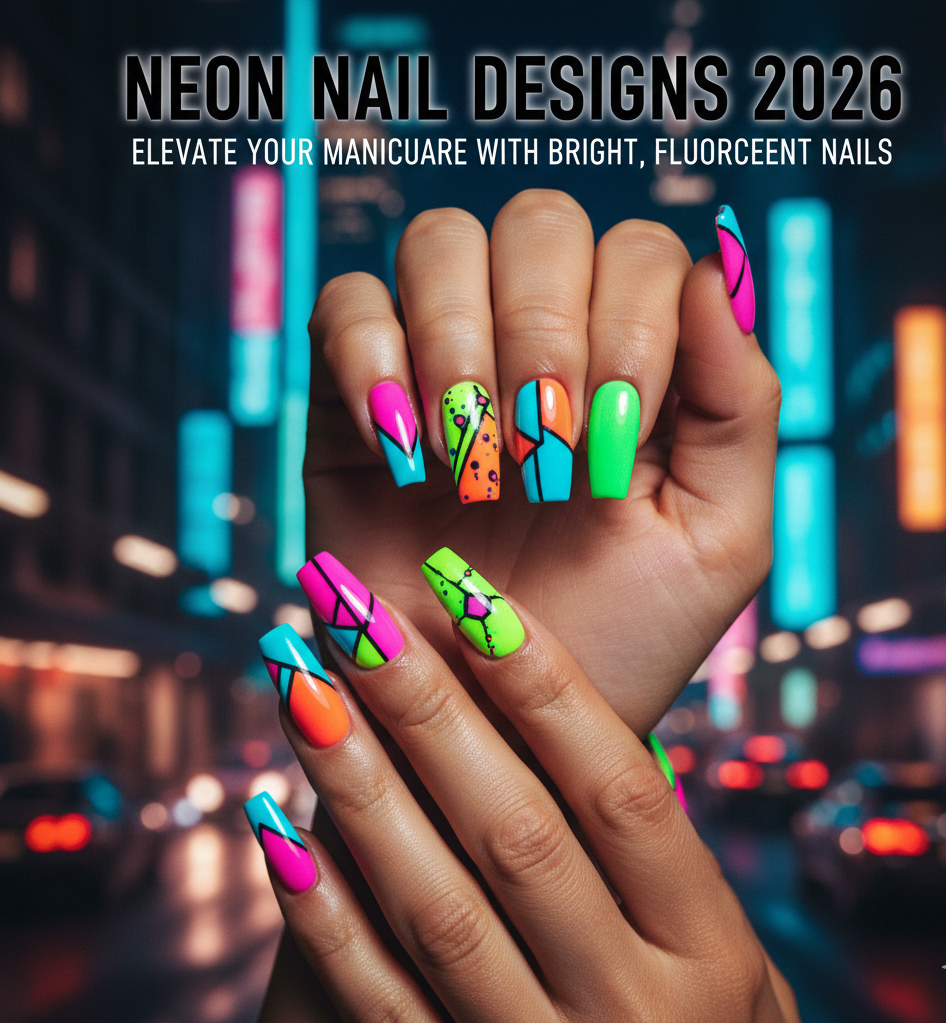
Neon Nail Designs 2026: Elevate Your Manicure with Bright, Fluorescent Nails
Get ready to glow with the latest trend in beauty: bright, fluorescent nails that light up your style. Neon nail designs have taken the world by storm, offering a vibrant way to elevate your manicure.These eye-catching designs are perfect for anyone looking to make a statement. With various neon nail art designs to choose from, you can easily find the perfect look to match your personality.
Whether you’re heading to a summer festival or just want to add some excitement to your everyday look, neon bright summer nails are a great choice. They offer a fun and creative way to express yourself through your manicure.

The Vibrant World of Neon Nail Art
Neon nail art has taken the beauty world by storm, offering a vibrant way to express oneself through bold, fluorescent colors. This trend is not just about aesthetics; it’s a form of self-expression and a way to stay on-trend in the ever-evolving world of beauty.
The neon nail art scene is thriving, with numerous designs and techniques available for those looking to make a statement. From simple, single-color manicures to intricate, multi-coloured designs, the options are endless.
Why Neon Nails Are Trending in 2026
In 2026, neon nails are trending due to their fun and playful vibe. They offer a refreshing change from the more subdued nail colors of previous years. Neon pink, neon orange, and neon yellow are among the top choices, providing a bright and cheerful look that’s perfect for summer or any occasion that calls for a bold statement.
The versatility of neon nail art is another reason for its popularity. It can be adapted to suit various nail shapes, lengths, and personal styles, making it accessible to a wide range of individuals.
The Psychology Behind Bold Nail Colors
Bold, bright nail colors like neon have a significant psychological impact. They can boost confidence, enhance mood, and even influence how others perceive us. Wearing neon nail art can be a way to express one’s personality, showcasing a fun, adventurous, and vibrant side.
Furthermore, the act of choosing and wearing bold nail colours can be therapeutic, allowing individuals to experiment with different looks and express their creativity.
Essential Tools and Products for Creating Neon Nail Designs
To achieve stunning neon nail designs, it’s crucial to have the right tools and products at your disposal. Creating vibrant neon nail art requires not just creativity, but also the correct materials to ensure a long-lasting and visually appealing finish.

Must-Have Neon Nail Polish Colors
The foundation of any neon nail design is, of course, the neon nail polish. Neon colors like pink, green, and yellow are staples in any nail art enthusiast’s collection. When selecting neon polishes, look for formulas that are highly pigmented and have a good glow under black light. Some popular brands offer a range of neon shades that are perfect for creating bold, eye-catching designs.
Nail Art Tools for Perfect Fluorescent Designs
Apart from the right polish, having the correct nail art tools is vital. Tools such as dotting pens, nail art brushes, and striping tapes can help you achieve intricate designs with ease. For more complex designs, consider using nail guides or stencils to ensure crisp, clean lines.
Base and Top Coats for Long-Lasting Neon Manicures
To make your neon manicure last longer, using a good base coat is essential. It helps the neon polish adhere better to the nail and prevents staining. For the top coat, consider using a glitter top coat or a chrome topper to add an extra layer of shine and protection. Some nail artists also swear by using a builder gel under the neon polish for added durability.
By combining these essential tools and products, you can create neon nail designs that are not only visually striking but also long-lasting.
Preparing Your Nails for Bright Fluorescent Designs
Before diving into the world of neon nail designs, it’s crucial to prepare your nails properly. A well-prepared nail surface is essential for a smooth, long-lasting finish. Proper nail care and preparation techniques can make a significant difference in the overall appearance and durability of your neon manicure.

Proper Nail Prep Techniques
To achieve a professional-looking neon nail design, start by ensuring your nails are clean and dry. Remove any old nail polish and push back your cuticles. Gently buff the surface of your nails to create a smooth canvas for painting. For short natural nails, it’s especially important to be gentle to avoid damaging the nail.
Use a nail file to shape your nails to your desired shape, whether it’s square, oval, or almond. A well-shaped nail enhances the overall appearance of your neon design. For those with short nails, consider simple neon nail designs that don’t require intricate details.
- Clean and dry your nails thoroughly
- Gently buff the nail surface
- Shape your nails to your preferred nail shape
Creating the Perfect Canvas for Neon Colors
To make your neon colors pop, apply a base coat that’s suitable for your nail type. For short nails, a nourishing base coat can help protect the nail. A white or clear base coat can help neon colors appear more vibrant. Ensure the base coat is fully dry before applying neon polish.
A smooth base coat application is crucial for a flawless neon finish. Consider using a base coat specifically designed to help nail polish adhere longer. This step is particularly important for achieving a long-lasting neon manicure on short natural nails.
Key tips for a perfect canvas:
- Apply a suitable base coat
- Ensure the base coat is fully dry
- Choose a base coat that enhances polish adhesion
Popular Neon Nail Designs and Techniques
The world of neon nail designs is vast and exciting, with numerous techniques to explore. Neon nail art has become increasingly popular, offering a wide range of creative possibilities for those looking to make a statement with their manicure.

Neon French Tips
Neon French tips are a bold twist on the classic nail design. By using neon polish for the tip, you can create a look that’s both elegant and eye-catching. To achieve this look, use a neon polish and a nail guide to paint the tips of your nails. You can choose a single neon color or mix and match different neon shades for a more dramatic effect.
Abstract Neon Nail Art
Abstract neon nail art is perfect for those who love creativity and uniqueness. This style involves using neon polish to create abstract patterns and designs on your nails. You can use a variety of techniques, such as dripping or splattering polish, to achieve the desired effect. The result is a one-of-a-kind manicure that’s sure to turn heads.
Ombre Neon Nails
Ombre neon nails are a great way to incorporate neon colors into your manicure while still looking stylish and sophisticated. This technique involves gradating neon polish from dark to light, creating a beautiful ombre effect. You can use a sponge or a special ombre brush to achieve this look.
Neon Geometric Patterns
Neon geometric patterns are a fun and trendy way to add some excitement to your nail design. Using neon polish and nail tape, you can create geometric shapes and patterns on your nails. This technique allows for a lot of creativity and experimentation with different shapes and colors. As one nail artist puts it, “Geometric patterns are all about playing with shapes and colors to create a unique look.”
These popular neon nail designs and techniques offer a great starting point for anyone looking to try something new and exciting with their manicure. Whether you’re a fan of classic French tips or more abstract designs, there’s a neon nail art style to suit every taste and preference.
Neon Nail Ideas for Short Nails
Short nails can be just as stylish with neon designs, offering a variety of creative options. Whether you’re looking for a subtle accent or a bold statement, neon nail art can elevate your manicure. Here, we’ll explore simple yet striking designs perfect for short natural nails and tips on making neon colors pop on shorter lengths.
Simple Neon Designs for Short Natural Nails
For those with short natural nails, simplicity is key. A single neon stripe or a minimalist neon tip can add a pop of color without overwhelming the nail. Neon French tips are a classic choice, offering a modern twist on the traditional French manicure. You can also opt for a neon accent nail, where one nail is painted in a bold neon shade to create a focal point.
Other simple designs include neon dots or small geometric patterns. These designs are not only easy to create but also add a playful touch to your manicure. For a more understated look, consider a neon ombre effect at the tip of the nail, gradually fading into a more neutral base color.

Making Neon Colors Pop on Shorter Lengths
To make neon colors stand out on shorter nails, it’s essential to choose the right shade and finish. Glossy neon polishes tend to be more vibrant than their matte counterparts, reflecting light and making the color appear more intense. For an extra bold look, consider layering neon polish over a white or light-colored base coat, which can help the neon shade appear more vivid.
Another tip is to keep the design simple and uncluttered. Too many elements can make short nails look busy. Instead, focus on one or two statement pieces, like a neon accent nail or a simple neon stripe, to create a clean and stylish look.
Bright Summer Neon Nails: Seasonal Inspiration
Bright summer neon nails are not just a trend; they’re a fun way to express yourself during the sunny months. As the weather warms up, neon nail designs become a staple for anyone looking to make a statement at outdoor events or simply elevate their everyday look.

Neon colors are particularly suited to summer, capturing the vibrant essence of the season. Whether you’re heading to a music festival, a tropical vacation, or just want to add some excitement to your daily routine, neon nail art offers endless possibilities.
Tropical Neon Nail Art for Vacation
For a tropical vacation, consider neon nail art that evokes the colors of the ocean and the lush surroundings. Neon pink and green can be combined to create a fun, island-inspired look. You can opt for a simple neon tip or go all out with intricate designs featuring palm trees or floral patterns.
Festival-Ready Neon Manicures
Music festivals and outdoor events are the perfect excuse to go bold with your nail art. Neon colors under black light are especially striking, making your manicure a focal point. Consider a neon ombre effect or geometric patterns that can be easily spotted from a distance.
End-of-Summer Statement Neon Designs
As summer draws to a close, make a statement with neon nail designs that are a little more daring. You can incorporate neon into a glitter gradient or pair it with metallic colors for a sophisticated yet eye-catching look. These statement designs are perfect for back-to-school or end-of-summer parties.
By embracing bright summer neon nails, you’re not just following a trend; you’re celebrating the joy and vibrancy of the season. Whether you’re lounging by the pool or dancing at a festival, neon nail art is sure to turn heads and add an extra layer of fun to your summer.
Step-by-Step: Creating Neon Swirl and Squiggle Nail Art
If you’re looking for a unique nail art design, consider trying neon swirl and squiggle patterns. These eye-catching designs are perfect for anyone who wants to add a bold touch to their manicure.
Materials Needed
To create neon swirl and squiggle nail art, you’ll need a few essential materials. These include neon nail polish colors in your chosen shades, a nail art brush for detailed work, and a dotting tool or a toothpick for creating the swirl and squiggle effects. A base coat and top coat are also necessary to protect your nails and make your design last longer.
Application Process
Start by applying a base coat to your nails to prevent staining and promote polish adhesion. Next, apply a coat of white or light-colored nail polish to act as a base for your neon colors. Using your nail art brush, paint small dots or lines of neon polish onto your nails. Then, use a dotting tool or toothpick to gently swirl or squiggle the polish into your desired design. Finish with a top coat to seal in your art and add shine.

Troubleshooting Common Issues
If your neon polish is too thick, try mixing it with a small amount of nail polish thinner. If your design is not turning out as expected, don’t be afraid to start over or try a different technique. Practice makes perfect, so keep experimenting until you achieve the look you want.
Step-by-Step: Neon Ombre and Gradient Nail Tutorial
Get ready to elevate your nail game with our step-by-step guide on creating stunning neon ombre nails and gradient nail effects. This tutorial will walk you through the process of achieving a beautiful, multi-dimensional look that’s perfect for any occasion.
Materials Needed
To create this look, you’ll need a few essential tools and products. Here’s a list of what you’ll need:
- Neon nail polish colors of your choice
- A makeup sponge for creating the ombre effect
- A base coat and top coat to protect your nails
- Nail art brushes for clean-up and detail work
- A nail polish remover for any mistakes

Application Process
Now that you have your materials, let’s move on to the application process. Start by applying a base coat to protect your nails. Next, select the neon colors you want to use and apply a thin layer of the lightest color to your nail. Use a makeup sponge to dab the colors onto your nail, starting from the center and working your way outwards. Repeat this process with the other colors, gradually building up the intensity of the ombre effect.
Use a nail art brush to clean up any excess polish around your cuticles and nail bed. Finish with a top coat to seal in the color and add shine.
Finishing Touches
To complete your look, apply a second coat of top coat to ensure long-lasting wear. You can also add additional details, such as glitter or rhinestones, to give your gradient nail art a personalized touch.
With these simple steps, you can achieve a stunning neon ombre or gradient nail effect that’s sure to turn heads.
Exploring Neon Color Combinations
The world of neon nail art is full of endless possibilities when it comes to color combinations. By pairing different neon shades, you can create unique and eye-catching designs that stand out.

One of the most striking aspects of neon nail art is the ability to mix and match various colors to create a look that’s truly yours. Let’s dive into some popular neon color combinations that are making waves in the nail art community.
Neon Pink and Yellow Designs
Combining neon pink and yellow creates a vibrant and energetic look perfect for summer. This duo is ideal for those who want to make a bold statement with their nail art. The contrast between the cool tone of pink and the warmth of yellow adds depth to the design.
Electric Blue and Lime Green Pairings
For a more edgy look, pairing electric blue with lime green is a great option. This combination is perfect for those who love bright, fluorescent colors. The cool tones of blue and green create a harmonious contrast that’s both striking and stylish.
Rainbow Neon Color Schemes
Why stick to just two colors when you can have a whole rainbow? Rainbow neon color schemes are perfect for those who want to add a bit of whimsy to their nail art. By incorporating multiple neon colors, you can create a truly unique and eye-catching design.
Experimenting with different neon color combinations allows you to express your creativity and stay on top of the latest nail art trends. Whether you’re going for a subtle look or an all-out neon spectacle, the key is to have fun and be adventurous with your color choices.
Advanced Neon Nail Art Designs
For those looking to push the boundaries of nail art, advanced neon designs offer a world of creative possibilities. These intricate and complex designs are perfect for individuals who want to make a bold statement with their manicure.
Some of the most striking advanced neon nail art designs include:
- Neon flame nail art, which adds a fiery touch to your nails
- Tie-dye neon designs, which create a psychedelic effect
- Stained glass neon effects, which mimic the appearance of stained glass
- Retro neon patterns, which bring back the nostalgia of the 80s and 90s
Neon Flame Nail Art
Neon flame nail art is a dramatic design that can add a bold touch to your manicure. To create this look, start by applying a base coat and then layering neon polish in shades of orange, red, and yellow to create a flame effect. Use a nail art brush to paint the flames, starting at the cuticle and working your way down to the tip of the nail.

Tie-Dye Neon Designs
Tie-dye neon designs are a fun and creative way to add some psychedelic flair to your nails. To achieve this look, use a sponge to apply multiple layers of neon polish in different colors, creating a marbled effect. Seal the design with a top coat to prevent fading.
Stained Glass Neon Effects
Stained glass neon effects can add a touch of elegance to your nail art. To create this look, use a combination of neon polish and clear polish to create a stained glass effect. Apply the polish in sections, using a nail art brush to paint the design. Finish with a top coat to seal the design.
Retro Neon Patterns
Retro neon patterns are a great way to bring back the nostalgia of the 80s and 90s. Use neon polish to create geometric patterns, chevrons, or other retro-inspired designs. Pair the neon colors with black or white polish to create a bold contrast.
These advanced neon nail art designs are sure to take your manicure to the next level. With a little practice and patience, you can create stunning and unique designs that showcase your creativity and style.
Neon Nail Art Ideas for Different Nail Shapes
Different nail shapes offer unique opportunities for creative neon nail art. Whether you’re looking to accentuate your natural nail shape or try something new, neon colors can elevate your manicure.

Almond Nails with Neon Accents
Almond-shaped nails are ideal for showcasing neon accents. The pointed tip allows for creative designs that extend from the cuticle to the tip. Try pairing a subtle neon base with bold, neon-colored tips or accents for a striking look. You can also use neon nail polish to create intricate designs along the nail bed.
Square Nails with Bright Designs
Square nails provide a clean canvas for neon nail art. The flat surface is perfect for geometric patterns or bold, graphic designs. Consider using neon colors to create a French tip variation or to add a pop of color to the nail corners.
Oval Nails with Fluorescent Art
Oval nails are versatile and can accommodate a variety of neon nail art designs. The curved shape complements ombre effects, gradient designs, or simple, elegant neon stripes. For a sophisticated look, try pairing neon with neutral or pastel shades.
By understanding how to adapt neon nail art to your nail shape, you can unlock a world of creative possibilities. Experiment with different designs and techniques to find the perfect look that suits your style and nail type.
Combining Neon Colors with Other Nail Art Elements
By combining neon colors with other nail art elements, you can create truly unique and eye-catching manicures. This fusion allows for endless creativity and personalization in your nail designs.

One of the most striking ways to enhance your neon nail art is by incorporating different elements. Let’s explore some popular techniques.
Neon and Glitter Combinations
Adding glitter to neon nail polish creates a dazzling effect that’s perfect for parties or special occasions. You can apply glitter on top of neon polish or mix it in for a marbled look. Glitter comes in various sizes and colors, allowing you to customize the level of sparkle you want.
Neon with Negative Space Designs
Negative space nail art involves leaving parts of your nail bare to create geometric patterns or designs. When combined with neon colors, it produces a modern and edgy look. This technique is great for those who want a subtle yet bold statement.
Chrome and Neon Effects
Chrome nail polish gives a mirror-like finish that can be paired with neon colors for a futuristic look. The contrast between the reflective chrome and bright neon creates a captivating visual effect. To achieve this, apply chrome polish over neon or use it as a base.
Jelly Neon Nail Finishes
Jelly nail polish has a translucent quality that allows the natural nail to show through. When used with neon colors, it creates a soft, glowing effect. Jelly neon nails are perfect for a more understated yet still vibrant look.
Experimenting with these combinations can help you discover new favorite nail art styles. Whether you’re going for bold and bright or subtle and sophisticated, the possibilities are endless with neon nail art.
Neon Acrylic and Gel Nail Designs
For those looking to make a statement with their nail art, neon acrylic and gel designs offer a bold and eye-catching solution. Neon colors have taken the nail art world by storm, and when combined with the durability of acrylic or gel nail enhancements, they create a long-lasting and vibrant manicure.

Long-Lasting Neon Gel Options
Neon gel nail polish is a popular choice for those seeking a high-gloss finish that lasts. To achieve long-lasting neon gel nails, it’s essential to start with a good quality gel base coat and top coat. Look for gel polishes that are specifically formulated for neon colors, as they tend to be more vibrant and longer-lasting. Some brands offer specialized neon gel polish lines that are designed to be highly pigmented and durable.
3D Neon Acrylic Art Ideas
For a more dramatic look, 3D neon acrylic art can add an extra dimension to your nail design. Using neon-colored acrylic powder, nail technicians can create intricate designs that stand out. Popular 3D designs include neon flowers, geometric shapes, and abstract patterns. The key to successful 3D nail art is in the application technique and the quality of the acrylic materials used.
Airbrush Techniques for Neon Effects
Airbrush techniques offer a versatile way to achieve neon effects on both acrylic and gel nails. By using an airbrush gun with neon-colored paints or inks, nail artists can create smooth, gradient transitions and intricate designs. Airbrushing is particularly effective for creating ombre effects and blending neon colors. It’s a technique that requires practice, but the results can be stunning.
By combining neon colors with acrylic or gel nail enhancements, and utilizing techniques like 3D art and airbrushing, you can achieve a truly unique and eye-catching nail design. Whether you’re looking for a subtle neon accent or a full neon manicure, these options offer endless possibilities for creative expression.
Neon Pedicure Ideas to Complement Your Manicure
Elevate your summer style with a neon pedicure that perfectly complements your manicure. A well-coordinated nail look can make a significant statement, and neon colors offer a vibrant way to express yourself.

Coordinating Neon Toe Nail Designs
When it comes to coordinating your neon toe nail designs with your manicure, there are several approaches you can take. You can opt for an exact match, where both your fingernails and toenails are painted the same neon shade. Alternatively, you can choose complementary colors that enhance your overall look without being identical.
Some popular ideas include:
- Neon ombre effects that transition from one color to another
- Glitter accents on the toes to add extra sparkle
- Neon French tips for a classic look with a twist
Summer-Ready Neon Pedicures
Summer is the perfect time to experiment with bold, bright neon pedicures. Consider designs that evoke the feeling of summer, such as tropical colors or fluorescent hues that glow under the sun.
Some summer-ready ideas include neon coral, electric blue, and lime green. These colors are not only fun but also perfect for making your nail look stand out during the warmer months.
Maintaining Your Bright Fluorescent Nail Art
To keep your neon nail art looking vibrant, it’s essential to follow a proper nail care routine. Neon colors can be prone to fading, but with the right maintenance, you can enjoy your bright fluorescent designs for longer.

One of the main challenges of maintaining neon nail art is color fading. To combat this, it’s crucial to use a high-quality top coat that helps lock in the color. Regular application of a top coat can significantly extend the life of your neon manicure.
Preventing Color Fading
Preventing color fading involves more than just using the right top coat. It’s also about avoiding harsh chemicals and detergents that can strip the nail polish. Wearing gloves when doing household chores or using strong cleaning products can help protect your neon nail art.
Additionally, keeping your nails moisturized is vital. Dryness can cause the nail polish to lift off, leading to fading. Using a nail oil or cream regularly can help maintain the health and appearance of your nails.
Touch-Up Techniques for Neon Designs
Even with proper care, your neon nail art may eventually need touch-ups. Touch-up techniques can help restore the original vibrancy of your design. For minor chips, you can use a fine brush to carefully repaint the affected area with matching neon polish.
For more extensive touch-ups, it might be necessary to reapply a layer of neon polish over the entire nail. This can help maintain an even color and prevent further fading.
Conclusion:
Neon nail designs have taken the beauty world by storm, offering a vibrant way to elevate your manicure and express your personality. Throughout this article, we’ve explored the world of neon nail art, from essential tools and products to advanced techniques and designs.
With the variety of neon nail designs and techniques discussed, you’re now equipped to create bold, fluorescent nail art that suits your style. Whether you’re looking for simple neon designs for short nails or complex neon nail art, the possibilities are endless.
By incorporating neon colors into your nail art, you can add a pop of color to your look and make a statement. Experiment with different neon color combinations, such as neon pink and yellow or electric blue and lime green, to create unique and eye-catching designs.
As you’ve seen, neon nail art can be paired with various nail art elements, like glitter, negative space, and chrome effects, to create truly show-stopping looks. With the right techniques and products, you can maintain your bright fluorescent nail art and keep it looking fresh and vibrant.
Now it’s your turn to shine with bold, fluorescent nail art. Get creative, try out new designs, and enjoy expressing yourself through the vibrant world of neon nail designs.